Monday, December 5, 2011

Santa Claus Is Coming To Town

Happy December! I am so excited that it's "the most wonderful time of the year", although it's hard to believe Christmastime is already here. Seriously, where has 2010 gone?! The Walker household is running a bit behind on our decorating this year since we were in Wichita for the long Thanksgiving weekend, but I'm excited to finally post about all of our old and new decor.

First up is my favorite part of Christmas, the real tree. As I mentioned last year, no matter how hard I try I just can't give up on the real Christmas tree. I think it's in my blood and no matter how many times Caton and I talk about "getting a fake tree for next year", I just don't see it happening. Ever. I just love having a real tree way too much to give it up, despite the common complaints: it's freezing cold when you pick it out, you have to buy one each and every year, the needles get all over everything (we are STILL finding them around the house from last years tree), and you have to remember to water it regularly (definitely not my strong point). But it's worth it. It's a small price to pay for all of the positives you get out of it: it's so much fun to searching for the perfect tree with my Love, it makes the house feel so cozy and seasonal, it smells AMAZING (!) every time we walk through the house, and well, it's tradition. It's been a tradition for me every single year of my life and now it's a tradition for Caton and me to carry on and (someday) share with our children. I know lots of people who have fake trees and just swear by them, and that's awesome, but for me, I wouldn't trade anything for all of those special memories attached to real Christmas trees! Here is our tree this year, with the addition of a few more lights and a few more ornaments to make it extra pretty.


I tried a new gift-wrapping technique this year found on (non-other than) Pinterest. Here is the link to this adorable example that I fell in love with! I was super-excited when I found the brown paper, which can sometimes be expensive at craft stores or Target) at Dollar Tree for - you guessed it - $1.00 per role in their shipping section. A friend of mine said she tried this last year and had a horrible time getting the tape to stick, so I went ahead and also purchased the $1.00 per role packaging tape and it has worked perfectly so far! I just made letter stencils, then used some Christmas-themed craft paper I got on sale at JoAnn's last week and went to work on gift-tagging each item with the recipients initial. I LOVE how they have turned out so far!


Next up is our house decorations. Last year we moved in to our rental house the day after Thanksgiving, so we were a bit rushed with unpacking and getting settled while also trying to get our house Christmas-ready so we could enjoy the holiday. Here (and here) is a refresher of how we decorated the house in 2010, using only the decorations we had from our apartment-living days. Wow, was it a shock to go from decorating a tiny apartment to filling up an entire house, but we wanted to work with what we had and avoid buying anything new until the after-Christmas sales, so we made it work! As you can see in the photo above, I bought garland to spruce up the mantle and also used a strand of red LED lights I purchased on clearance last year. I love how it turned out!


Our entry-way table receive a little lovin' this year as well. I moved my (tiny) garland that was placed on the mantle last year and instead placed it on this table, where it fits much better. I brought out my adorable "cowboy snowmen" to liven up the table and also added a fun new piece above. You may remember my Happy Holidays sign from this post last February. My MIL and I found these adorable handmade Christmas signs at our favorite thrift store in Wichita and I have been so anxious to use them for over 10 months!


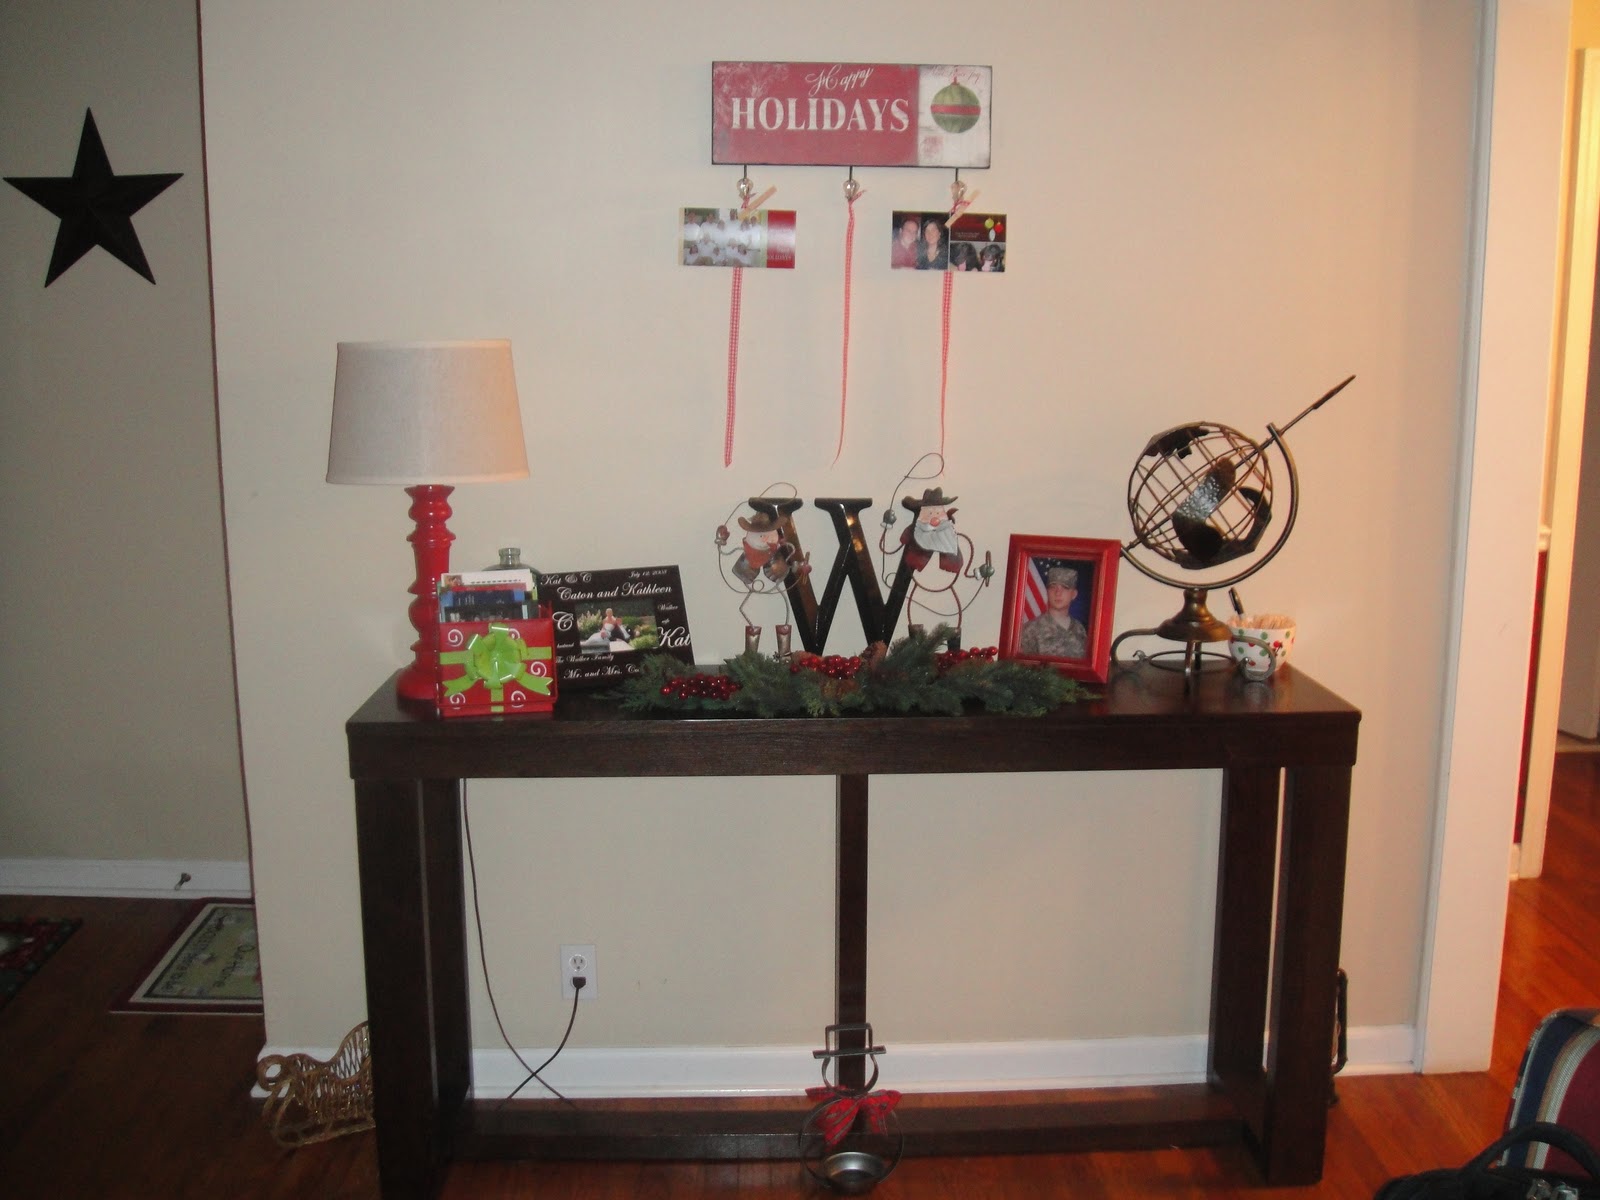
My hubby was kind enough to hang this sign for me over the weekend while I finished up my first Christmas Pinterest project of the season - a holiday card holder. I found the idea from this Pinterest post and knew instantly that I could use my three-hook sign to make my own version. I am one of those people who saves every special note, card, invitation, photo, etc, so it's no surprise that I have an entire bin (or in this case, a gift-wrapped looking bin - seen on the left hand side of the table) to house every Christmas card we have every received as Mr & Mrs Walker, and probably before. I love this adorable idea because it allows us to admire each photo or card all season long. I simply found some ribbon on sale at Michaels, cut them the same length and tied them onto the hooks. Easy-peasy. Then I grabbed one of our small holiday bowls to hold the rest of the clothes pens and a Sharpie ( I use it to write the year on the back of the card if it isn't already printed). Less than five minutes later we had this (my Aunt Molly, and her family, and my friend Mary Beth, and her hubby, are the first two cards we've received this year!).


The Dining Room is decorated pretty much the same as last year, with the addition of my amazing blue runner (found on clearance for $10 at Crate & Barrel - amazing!) and the relocation of my other cute western figures on the buffet.


The Family Room now houses the adorable Santa bowl (Caton's favorite decoration we own) with ornaments as well as our newest decoration. My amazing Aunt Susie gave (GAVE!) us an old Plaza Lights banner she had. *Sidenote - I have been wanting to collect these as long as I can remember, but haven't gotten around to researching/purchasing any of them. When Susie sent me a message on Facebook saying she had one if I wanted it I literally jumped up and down while I was sending her a comment back, and then I went to pick it up the very next night. Super excited doesn't even begin to describe it. It's perfect in our Family Room, which has a super-long wall that is hard to fill/decorate, and we just smile every time we walk into the room. Love Love Love!


And last, but not least, is our outside decor. We went on an Christmas-clearance-spending-spree last year after Christmas, so I have been waiting many months to finally decorate our house with lights. It took us a couple weeks (and learning the hard way to not take advantage of the 50 degree weather in early December) and some frozen fingers and toes, but we (and when I say "we" I mostly mean Caton!) finally got them up on the house and couldn't be more excited. I love them and think the lit up Christmas tree in the front window is adorable! Don't mind the security light over the garage. We still want to get some lights on the bushes, so I'll update the photos after we get the new lights up this weekend.


Well, that wraps up the holiday decorations at Casa de Walker... for now. I still have a few Pinterest projects I want to tackle this weekend, so stay tuned for those updates. We could not be more excited to spend Christmas Eve and Day with the Fagan family and enjoy our tree and decorations all month long!

Monday, November 21, 2011

It's the Most Wonderful Time of the Year

Maybe that should say it's almost the most wonderful time of the year?! It's hard to believe Christmas is a little over a month away, but we are getting super excited! I'm normally not one of those who decorate and listen to Christmas music before Thanksgiving, but things have been a bit different this year. I have been so anxious to get our decorations up (which I did last weekend - more details to come after we buy our tree next weekend) and get our holiday cards purchased. I just live for holiday cards - making ours and rushing home every day in December to see whose card we receive that day/week to add to our collection.

It goes without saying that I will get our holiday cards from Shutterfly. I just love them so much! Remember these cards from last year?! I still get a smile on my face looking at them online. Well, I'm at it again this year and couldn't be more excited about the cards we've selected (although, Caton won't know which cards "we've" selected until they arrive on our doorstep!). So get ready family and friends... the Walkers will be hitting your mailbox in the next few weeks to wish you a very Merry Christmas and a Happy New Year! And for a sneak peak, check out my widgets on the right hand side of the page... just act surprised when you receive them in the mail, ok?! :)

Monday, October 17, 2011

Fork & Spoon Art

As you all know, I took a little break from blogging and DIYing over the summer, and I also took a break from my thrift store shopping. Yeah, it was as horrible as it sounds, but we were so busy that I wouldn't have had time to work on projects anyway. The last time I went to Savers was back in March and I couldn't have been more excited to find these beauties sitting on the shelves just waiting to be snatched up and, hopefully, given some spray paint love. I have seen other crafty bloggers use these decorations in their kitchens/dining rooms for years and couldn't wait to get my hands on a pair. The ones I found, although a not-my-favorite-or-even-kind-of-doable rusty gold color, were only $3.99 a piece, made of heavy duty metal and well over a foot long each (I put my iPhone in the photo below to show you a comparison). Woohoo! This is what they looked like back when I first picked them up (and how they stayed over the last 6 months while they sat in the basement).


I had seen them all over blogs and websites for years, so I had lots of ideas for how to hang them and what color to spray them, but ultimately went with my beloved Oil Rubbed Bronze. I just love how well they go with the pot holder next to them. I've only had them up for a few weeks, but I still get a smile on my face every time I walk by the kitchen. Such a fun, easy and inexpensive way to add some "art" to the tiny kitchen!


Friday, October 14, 2011

Wine Cork W

So... it's been a little over four months since I've posted anything on the ole' blog. Woops! I knew I was going to take a bit of a break with DIY projects over the summer so Caton and I could spend all of our time enjoying the weather outside, visiting family and friends, going on vacations and not being cooped up in the house, but I have no excuse for the last month or so since fall officially began. I'm happy to report that I have been working on a few fun things around the house, so I'm excited to share them over the next couple of days and weeks.

First up is my wine cork W. I originally saw this idea on Pinterest (I'm just as obsessed as everyone else, for sure!), originally found from this site, and have been gathering up supplies over the last few months. It's no secret that Caton and I enjoy a glass of wine every now and then, and we (well, at least I) have been drinking it since college (as you can tell from the huge hurricane of corks shown below), so there is quite an accumultion of corks. The only problem was that I wanted this particular project to have all real corks instead of those rubber ones that many companies are switching to lately. So, thanks to the help of my lovely vino-loving friends and family, as well as generous wine bar up in Parkville that let me raid their stash, I finally had all the corks I needed.


The process is pretty self explanatory... buy a cardboard letter from Hobby Lobby, arrange corks as you wish (asking your helpful hubby to cut a few of them to size with the appropriate tools) and hot glue the corks to the letter. When you take out the months of waiting time to come up with enough real corks to fill the W, this entire project only took about 20 minutes. So easy and such a fun addition to my favorite piece of furniture in our entire house, my 9-cubby shelf!


Friday, June 3, 2011

Mason Jars & Worm Drive Clamps = Birthday Gifts

I know it sounds absolutely crazy, but I promise that when you take one of these, and one of these, along with some craft paint and a piece of wood...

you get a pretty little something that looks like this…


I was introduced to Pinterest (one of my new favorite sites in the whole wide world – yes, I love it that much) AND this amazingly fun mason jar vase by one of my coworkers/friends that loves all things crafts/projects/DIY as much as I do. It was love at first sight email-showing-each-other-cool-craft-ideas-and-projects-we-want-to-DIY-at-home. She’s the best. Anyway, when she sent me a joking email with a picture of this fun vase and said, “I think you should make this for me for my birthday next month!” little did she know I would actually pin this to my Pinterest board and most definitely make it for her birthday the following month.
This project is pretty quick and easy; it took me two nights once I had all of my supplies. I had about a month to work on this since her birthday was later in May, so I took my time finding the perfect mason jar throughout the month. I tend to see them every time I go thrift shopping, but I have rarely seen color tented jars, so I was super excited to find a blue/green mason jar a few weeks ago. Then, I went to a local hardware store to pick up a metal worm drive clamp. They come in various sizes, and are probably even less expensive at big box stores like Home Depot and Lowe’s. I think the one I picked out was around $2.00. I had some scrap wood on hand at home, but wanted this to be a specific size and style, so I went ahead and picked up a small piece of wood at the hardware store as well, which my dad helped me cut it to size with his skill/hand saw. I also had some craft paint on hand (black, white and teal – which is just what I was wanting) so I was ready to get to work.
The first night was spent painting the piece of wood. First I painted the entire thing white (as shown below), let that dry for a while, and then alternated brushing on some black and teal paint in random spots. I didn’t really have a specific technique; I just brushed on some paint and used an old rag (or the dry part of the brush, at times) to give it an antiqued look. Lucky for me, I loved the end result!

After the paint had dried overnight, I requested my Dad’s help once again. I found the exact spot that I wanted the clamp to be attached to the wood, and marked it with a pencil. My Dad then drilled a pilot hole through the clamp. Since the wood was soft enough, he didn’t have to drill a pilot hole into the wood (This is just one of the reasons why I LOVE having a dad that has owned a construction company for as long as I’ve been alive. If I had been taking on this project as the novice that I am, I would have gone about this all the wrong way, so I was very thankful for his experience and help!). After he put a tiny screw through the clamp and into the wood, I simply slid the jar into the clamp, tightened it with a screwdriver and the project was complete!


I gave her the gift the next morning and, much to my delight, she was surprised (she had forgotten she even sent me the picture) and loved it. Success! Now I just have to find another “perfect” mason jar so I can make one for myself!

Friday, May 13, 2011

Have Your Cake And Eat It Too

Definition:  To have one's cake and eat it too is a popular English idiomatic proverb or figure of speech, sometimes stated as eat one's cake and have it too or simply have one's cake and eat it. This is most often used negatively, meaning an individual owning a thing, and still attempting to benefit from or use it. It may also indicate having or wanting more than one can handle or deserve, or trying to have two incompatible things. The proverb's meaning is similar to the phrases, ‘you can't have it both ways’ and ‘you can't have the best of both worlds’.” 
Source (although not the most accurate source out there on the World Wide Web, it works for this fun-natured post)
I came across this post in one of the weekly DIY emails I receive and instantly fell in love, as I have with a few of my little (or big) project ideas. How cute are these cake stands? Naturally, cake stands make you think of cake, and cake makes you think of the phrase “have your cake and eat it too”. I completely understand why and how the figure of speech is used negatively, but in this case I think it can be switched around to be positive.  Hear me out…
“meaning an individual owning a thing, and still attempting to benefit from or use it”- Um, yes please! I love finding things I already own around the house and figuring out a way to re-purpose it (whether it gets some DIY love or not) to get more (or better) use out of it than I was previously.
“may also indicate having or wanting more than one can handle or deserve” – Let’s be honest, my husband doesn’t think I need to purchase/create/DIY/or even inherit another serving piece for as long as we both shall live! I already have way more than I can handle store and deserve am thankful to have received, but I will always welcome more and the hubby… well, he will smile and tell me “a happy wife makes a happy life”. J
“or trying to have two incompatible things” – Such is the DYI motto, at times. Taking something (or some things) and making them more practical/fun/meaningful, even if those separate things may not “fit” together at first glance.
After you see my short-but-sweet tutorial below, you will most certainly believe that when it comes to DIY cake stands ‘you can't can have it both ways’ and ‘you can't can have the best of both worlds’… I promise!
I mentioned in this post that I found some cute, and super inexpensive, plates and candle sticks with cake-plate-making on the brain while I was bargain shopping in March. After I gathered all of my supplies I just knew I wanted to make them for part of our Mother’s Day gifts for our moms. I had already purchased some fun spring/summer spray paint colors for other projects and picked up some epoxy at the same time, so when you add in the plates & candlesticks - $0.99 each (plates) & $1.99 each (candlesticks), this was a really cost-effective gift. *Fun fact – the plates I found are branded on the bottom with the Independence Ironstone logo. If you Google it, there are tons of pieces and entire sets for sale. While it isn’t reselling for huge amounts of money, it is neat to know I found plates that have some history. *
The first task was to glue the plates to the candle sticks. I was nervous to use epoxy for the first time ever, but the directions on the box made it really quick and easy and it worked like a charm! If you’re nervous like me, just ask your hubby or significant other to stand right next to you; the moral support works wonders for Nervous Nelly’s like me! Anyway, the epoxy was amazing and it took a matter of minutes before these two objects were "stuck like glue", as my beloved Sugarland would say.


The second, and last, task (I told you this was a quick and easy project) was to spray paint the bottom of the plates and candle sticks. I took a large piece of cardboard in the backyard and just sprayed and sprayed until I thought it looked coated on every nook and cranny. You definitely don’t want any of the paint to get on the top side of the plate, and I saw suggestions of using painters tape to keep the paint off of that side, but I felt like my plate was flush enough against the cardboard to do the trick, and I was right. I found out I had a couple little specs of paint on the top of the plate (once it dried and I was able to turn it over), but I just scraped them off with my fingernail and was good to go! I followed my trusty instructions from the Eat Drink Pretty blog and washed the top of the plate off with hot, soapy water (this will never be dishwasher safe, but most of my serving pieces aren’t - and even if they are, I feel better about hand washing them anyway) and they were complete!
When I gave my mom (I will be giving it to my mother-in-law next weekend, so I hope she doesn’t check the ole’ blog before then!) the blue one last weekend I told her I had spray painted the bottom (better safe than sorry, so I wanted to disclose as much information as possible) and let her know that there is no paint on the top of the plates, so cakes, cookies, snacks, etc can all be served off of this surface. If they decide they want to be extra cautious (in the event the food is placed on the outer rim of the plate instead of just in the center), they can always place a cute napkin or doily on the plate before setting out the food.


So, what do you think?! I’m so in love with it that I’m now on the hunt for cute plate and candle sticks/coblets/bowls/etc to make a few more for my own collection. I have already made one platter out of another plate and mini bowl I found at Savers last month (a full Bargain Shopping – April 2011 post to come soon). The plate is from Nell Hill's , and I just love the color, so I decided to simply glue the two together with epoxy and leave them as-is.

Loving the small plate (with dots that go so well with our dinner and serving ware) and the mini clear “stand”; I can’t wait to use it during our next party. It’s totally normal to plan a “girls’ (wine) night out” simply to show off my new serving dish, right?! Yep, I thought so!
Enjoy having your cake and eating it, too, friends!


Monday, May 2, 2011

"Note"-worthy Birthday Gifts

I turned 27 on April 13th. Crazy! Two weeks after that, my sister, Jeannie, turned 25 on April 27th. It has always been fun for us to have our birthdays exactly two years and two weeks apart. I don't know about all of you, but I love gift giving. I love it ten times more than gift receiving! I have birthday and Christmas gift ideas running through my mind the day after I give them their gifts and just hope I am able to remember them for 364 more days. I'm a dork like that!

Anyway, so when it came to my sister's birthday, I knew exactly what I wanted to get her... stationary. It may sound weird, but we're a big stationary family. We were taught from a very young age that when we are given gifts, we should show our appreciation by sending a hand-written thank you card and it is something that has stuck with me my entire life. It stuck so hard that I don't think it even came as a surprise when my bridesmaids were given personalized stationary as gifts for being in my wedding. And, as far as I know, the gift was a huge hit! There is just something about seeing your name in perfect and fancy writing on a pristine note card, and then being able to express you gratitude for a gift or kind gesture, or just sending a simple hello to bring someone a smile. Love! I'm sure my Mom has given us stationary from numerous places over the years (we always received different styles, fonts, colors, etc for various birthday and Christmas gifts growing up - and she even gave some to my husband for his college graduation, since it's perfect for job interview thank you's and follow-ups!), but the brand that always comes to mind is Embossed Graphics. Maybe she'll comment on this post and let us know her favorite places to shop for stationary - thanks in advance for that, Mom! :) This stationary can be purchased from various vendors online (and at Statements, a gift store for all you KC peeps) and is my absolute favorite! I just recently purchased this Somerset Wardrobe set for myself a few months ago from giftsin24.com and just love it.

Since I have always been so pleased with my stationary from EG I was planning to buy the same set for my sister, until I came across this new (or new-to-me) online store for all things stationary-cards-business needs and couldn't get enough of vistaprint.com. I decided to continue looking around for a couple days before placing my order and signed up for the email list, only to find some amazing deals in my inbox over the next 24 hours. I was so impressed with the options, prices and production time (I had read online that even if you pick the slowest shipping method - which claims it could take up to a month to receive your order - that it will really ship within one week) that I couldn't pass it up. So, I set out to make the following two sets of stationary for Jeannie. Once I got through the process of picking out the design, personalizing my order and getting ready to purchase, I was prompted to create FREE (and matching!) return address labels for each set. Bonus! So, enough rambling from me; I want you to see what I created. The first is a basic card for Jeannie to send out thank you cards or special notes to family and friends. The second is so fun and something I didn't even know you could do - a personalized-to-every-family-member card for Jeannie and Chad to send out as a family thank you or, possibly, a thank you card from one of their boys. They were so much fun to create and hopefully something they can use for years to come (since the little "people" are saved in my vistaprint account forever) Love love love them!

Jeannie Wohletz - I love the fancy font and the pretty swirly flowers for my girly-girl sister!


The Wohletz Family - I just can't get enough! It was so fun to see Jeannie's & Chad's faces when
they saw how much these caricatures actually resemble each one of the Wohletz family members.


So, what do you think?! I had these wrapped and sitting  hiding in our master closet for at least two months (I told you, they came way faster than I thought they would) before her birthday. And let's be honest, I had to hide them not because I was scared someone would see them, but because I needed them out of sight/out of mind so I wasn't tempted to give them to her early! And when I was finally able to give them to her last week... she LOVED them!

PS - If you happen to try your luck  design skills at vistaprint, don't forget to sign up for the email list first AND don't forget to search Google for any possible coupon codes that they have out there for all to use. Happy gifting!

PPS - A big thank you to my wonderful parents for instilling such a great traditional and habit in out lives. I am still so grateful! Love you!

Sunday, April 24, 2011

Baseball Bat Table

Baseball bat table? I know, it definitely sounds weird. I didn’t know what to think when I was skimming through one of my weekly craft emails and saw a link for a baseball bat nightstand, but I had to check it out. When I read this post from the wonderful blog, Love of Home & Family I was super-excited for two reasons: one, I had a baseball bat that I found at a thrift store and had never put to use and two, I had a baby shower coming up for my newest nephew and the theme for his nursery is none other than sports! I just knew it was meant to be and couldn’t wait to get started!
The first thing I had to do was find an old table to use as the base and top. I threw around the idea of buying the wood from Home Depot and cutting it to shape myself, but the price was going to jump way over my budget and the tools required weren’t readily available to me in the short timeline I had to complete the project (about two weeks).
I spent over a week searching Craigslist for possible end tables, nightstands and plant stands to make the project work, but I came up empty-handed… until 3 days before we were leaving for the baby shower in Wichita. The Tuesday before we were leaving for our weekend getaway, I did my usual Craigslist search and couldn’t believe that the perfect table candidate had been posted the day before. I swapped emails with the owner and finally picked up the table on Wednesday over my lunch break.
Once I had the tables (I actually purchased two because they were plant stands that came as a pair) I immediately called my Dad to see if he was free that evening to help me work some power tools (Caton was out of town on business that week and we have decided it’s probably not best for me to use power tools by myself at home without him – hehe) and luckily, he was. After work, I went home to grab my baseball bat and headed over to my parents’ house for a quick dinner and we got to work. I forgot my camera (I was so anxious and excited to get over there and get to work), so I’ll have to show you the finished product. Here is a quick run-down of what we he did: (1) Detach the top and base from the center post of the table. (2) Use a hand saw to cut off a tiny sliver of the base of the bat (where your hands grip the bat) to make it even  (the top of the bat had a bigger surface area and he felt it was smooth enough to fit flush against the top of the table). (3) Take the sander attachment of the Dremel and use it to smooth out the bottom of the bat that had just been sawed off. This step was an afterthought once we realized the cut hadn’t been made perfectly even and the table was going to lean slightly to one side once it was put together. (4) Pre-drill holes into the top and bottom of the bat and then screw the top and base of the table to the bat. And, ta-da, you have this:

I was so excited that it worked! Later that night, once I drove home as slowly as possible so the newly assembled table wouldn’t roll around too much and snap apart, I decided to get it prepped and get a coat of paint on it (since it was already Wednesday evening and we were leaving Friday afternoon). First, I took some wood putty and fill the screw holes (and any other imperfections), let it dry and sand it off for an even finish with the wood.  

Next, I took some old grocery ads from our recycling bin and taped them around the bat since I knew I didn’t want any paint to cover the authentic coloring it already had. Then, I took a can of white primer spray paint (although I could have just as easily used a can of paint and a brush, but I had the spray primer on hand) and coated the top and bottom about 3-4 times.

Once that was dry (it only took about 10 minutes for each coat to dry), I decided to get the baseball seams on the table before I called it a night. I used a suggestion made by Love of Family & Home and got a glass dinner plate to trace each half circle with a pencil, then I drew in all of the seams by hand and traced the whole thing with a red Sharpie (although I could have just as easily used a small brush and some craft paint, but I had the Sharpie on hand and thought a marker would give me more control and precision than a paintbrush). 

The next evening, after everything was 100% dry, I finally talked myself into trying to paint home plate on the base of the table. I used a ruler to draw the straight lines and then outlined the entire thing with a black Sharpie.

Next, I took some brown paint that I picked up on sale at Micheals, poured it on a plate and used a sponge brush to dab the paint all around the plate to look like dirt. What do you think?!


So, at the end of night one (although, I took the picture the following morning), this was the final result.


Even though I went to work on Thursday morning thinking the project was complete, I had been debating back and forth about whether or not to try to antique the baseball portion of the table and was especially nervous since I had never tried to antique anything (yes, antique is being used as a verb here!), but in the end I decided it would look best. So, when I got home from work that evening, I poured out a good pile of the paint I had used for the dirt and soaked up a good amount. After I rubbed it all over a small portion of the table, I took an old rag and wiped it off, leaving behind a small amount of brown that made the baseball look old and used, just how I wanted it to appear. I didn’t take any action shots since I was so nervous I would leave the paint on too long, but here is an after shot.

I just loved it! In fact, I loved it so much that I called it done and decided this was the final product… until I realized how extremely white the home plate looked, especially with the newly-antiqued baseball. And let’s be serious, home plate rarely looks this clean and perfect, expect for the minute before the game actually begins. I had debated back and forth on whether or not I should do the exact same antiquing method I had used for the baseball, or if I should change it up. In the end, I decided to change it up a bit, so I took more brown paint and another (smaller) sponge brush and started putting the paint all over home plate in small, imprecise strokes that made it look good, but not too good and dirty, but not too dirty… sorry I don’t have a technological term for that particular method of painting. Hehe So, in the end, this was my final product and first homemade gift for our newest nephew!

I seriously cannot get enough of it and can’t wait to see what it looks like in his sports-themed nursery! I gave it to Erica and Dan a few weekends ago at their baby shower and it was a huge hit!

Speaking of Erica's baby shower, I want to throw in another quick project that I did for the shower gift. You may remember me mentioning these awesome baseball and basketball frames in this post.


I took out the back and glass, laid them out on some cardboard in the backyard and covered them with silver spray paint that we already had laying around for other projects. What do you think?! It's pretty amazing what a few coats of silver spray paint can do to liven up (and modernize) a few picture frames. Love!


So, there you have it! I could not be more excited to give these super-personlized and made-with-love gifts to my brother-in-law and sister-in-law and know that they will fit so perfectly in their new nursery. Now we just have to wait and see if the little guy is a sports fan!