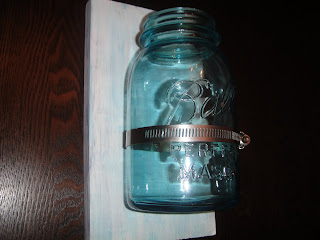
I know it sounds absolutely crazy, but I promise that when you take one of these, and one of these, along with some craft paint and a piece of wood...
you get a pretty little something that looks like this…
I was introduced to Pinterest (one of my new favorite sites in the whole wide world – yes, I love it that much) AND this amazingly fun mason jar vase by one of my coworkers/friends that loves all things crafts/projects/DIY as much as I do. It was love at first sight email-showing-each-other-cool-craft-ideas-and-projects-we-want-to-DIY-at-home. She’s the best. Anyway, when she sent me a joking email with a picture of this fun vase and said, “I think you should make this for me for my birthday next month!” little did she know I would actually pin this to my Pinterest board and most definitely make it for her birthday the following month.
This project is pretty quick and easy; it took me two nights once I had all of my supplies. I had about a month to work on this since her birthday was later in May, so I took my time finding the perfect mason jar throughout the month. I tend to see them every time I go thrift shopping, but I have rarely seen color tented jars, so I was super excited to find a blue/green mason jar a few weeks ago. Then, I went to a local hardware store to pick up a metal worm drive clamp. They come in various sizes, and are probably even less expensive at big box stores like Home Depot and Lowe’s. I think the one I picked out was around $2.00. I had some scrap wood on hand at home, but wanted this to be a specific size and style, so I went ahead and picked up a small piece of wood at the hardware store as well, which my dad helped me cut it to size with his skill/hand saw. I also had some craft paint on hand (black, white and teal – which is just what I was wanting) so I was ready to get to work.
The first night was spent painting the piece of wood. First I painted the entire thing white (as shown below), let that dry for a while, and then alternated brushing on some black and teal paint in random spots. I didn’t really have a specific technique; I just brushed on some paint and used an old rag (or the dry part of the brush, at times) to give it an antiqued look. Lucky for me, I loved the end result!
After the paint had dried overnight, I requested my Dad’s help once again. I found the exact spot that I wanted the clamp to be attached to the wood, and marked it with a pencil. My Dad then drilled a pilot hole through the clamp. Since the wood was soft enough, he didn’t have to drill a pilot hole into the wood (This is just one of the reasons why I LOVE having a dad that has owned a construction company for as long as I’ve been alive. If I had been taking on this project as the novice that I am, I would have gone about this all the wrong way, so I was very thankful for his experience and help!). After he put a tiny screw through the clamp and into the wood, I simply slid the jar into the clamp, tightened it with a screwdriver and the project was complete!
I gave her the gift the next morning and, much to my delight, she was surprised (she had forgotten she even sent me the picture) and loved it. Success! Now I just have to find another “perfect” mason jar so I can make one for myself!


No comments:
Post a Comment