I'm sure it comes as no surprise that I am obsessed with Pinterest, along with everyone else I know, and although I love many things I see on a daily/weekly basis, I have fallen in love with the idea of a gallery wall. I have seen them on blogs, in other friends' homes and, of course, in abundance on Pinterest. For the last few months I have been telling myself, "someday... when we have a house of our own... with a big hallway... or empty wall... and I have time to really put all of my ideas together... I will have a gallery wall... someday..." and in the meantime I just dream about beautiful gallery walls such as this, this and this.
Well, much to my pleasant surprise, "someday" came a lot sooner than I thought. When Caton and I returned home from visiting the in-laws after Christmas, I decided to take down our Christmas decorations and get the house completely back to normal before our New Years Eve party. I took down our holiday card holder (aka my new favorite holiday decoration) and a light bulb went on in my head. This. Wall. Is. Perfect!!! Just look at all of that space. And who doesn't like a gallery of photos, art, and memorabilia to greet you and browse over when you walk into some one's home.
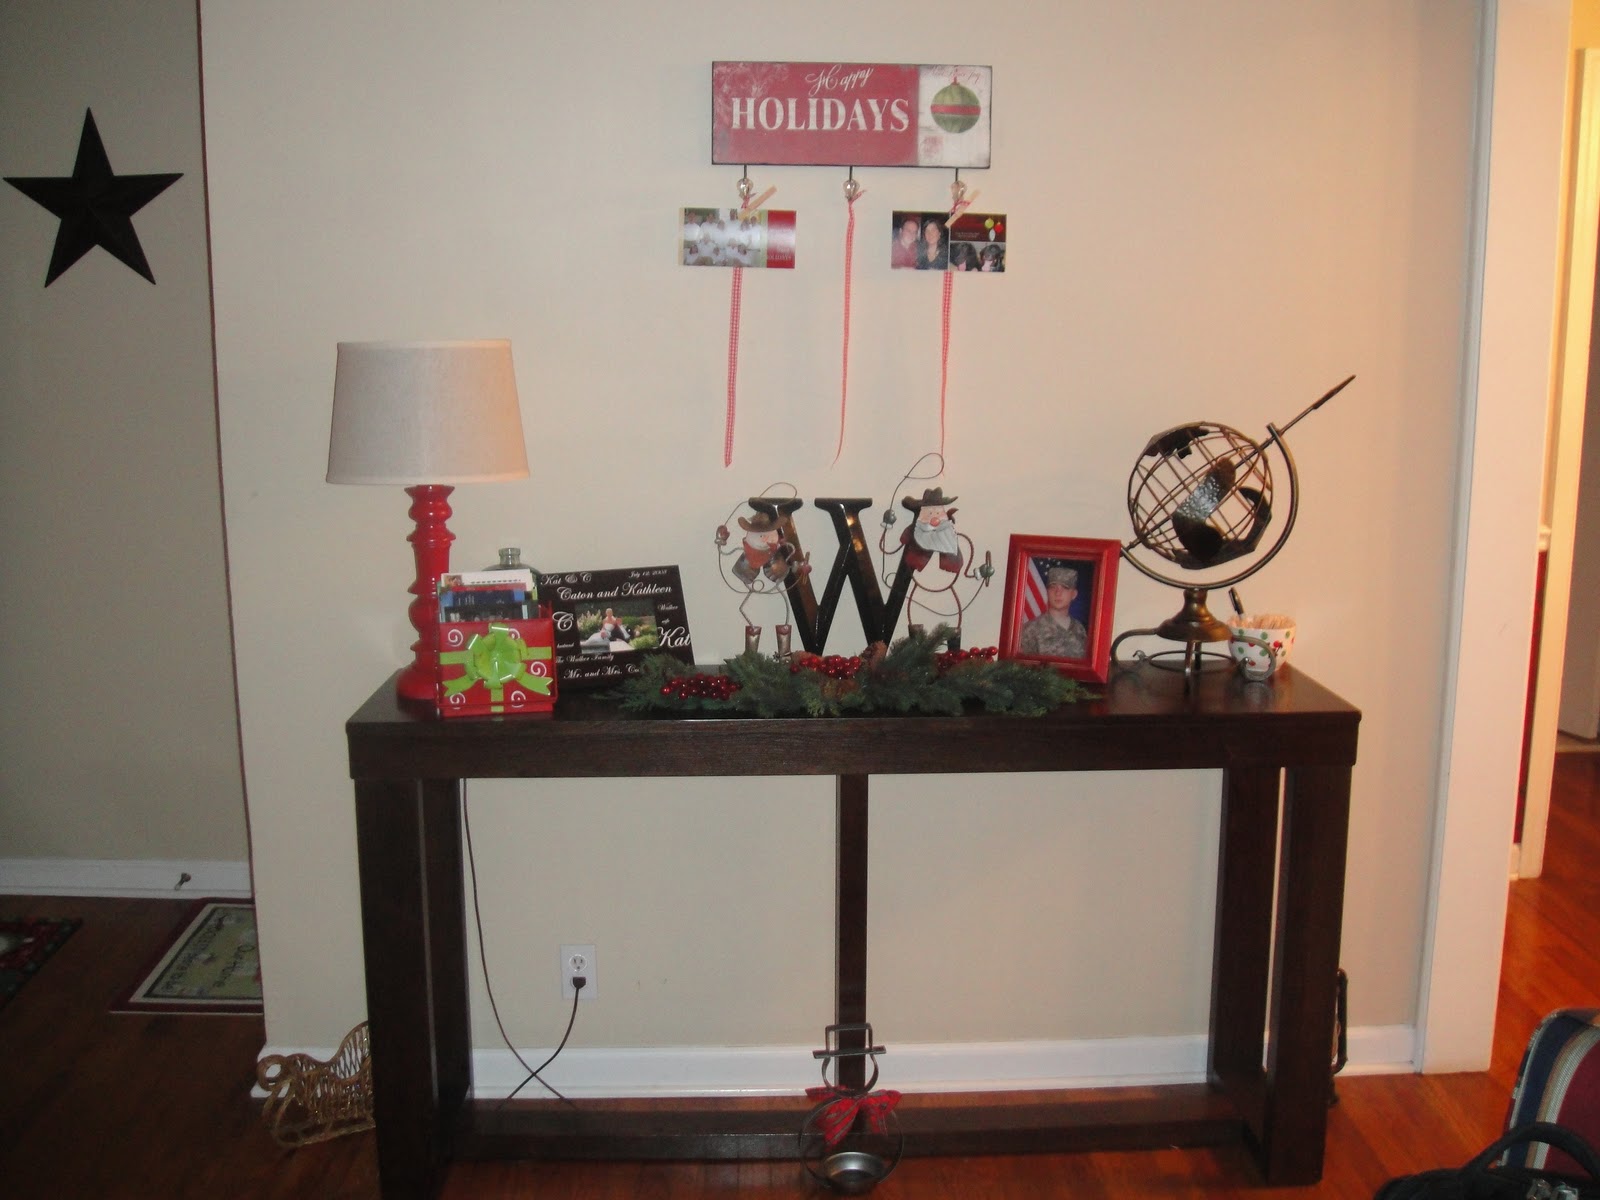
Here is what the wall looked like when we moved in last year right after Thanksgiving and had put up a few decorations for Christmas 2010.

And here is what the wall looked like when we decorated the house for Christmas 2011. I wish I had taken a photo of the card holder after the holiday; there were so many cards you couldn't even see the ribbons hanging down anymore. It was so fun to walk by each day and see photos of our family and friends. This card display is going to stick around for years to come!

The first thing I did was begin gathering up unused photo frames, photos, pieces of "art", memorabilia and wall decor that we had around the house. Some of the items were already being used in other rooms, but never felt just right in their current "home"; while some items had been packed up in boxes for the last year since we never found a place for them to be used. The frames I found were different shapes, sizes and colors, but I was determined to work with what I had to make this project as inexpensive as possible. I have seen many gallery walls that have a variety of frame colors and they look amazing, but my Type-A, OCD-self wouldn't be able to handle that. I already had a few frames that were black, and felt white frames would clash with our beige walls, so I went to Michael's and purchased a couple bottles of black acrylic paint in gloss (I wanted the frames to appear shiny so they matched the ones I already owned) and got to work. It took a day and a half to paint all of the frames with a few coats, but it was well worth the time to save all of the money it would have cost to buy new frames.
After the frames were painted and filled with photos, word prints, and other various items, I got to work on what I believe to be the most important step of the entire project. I had seen this method used many times all around Blogland, and I am so thankful I took the time to test it out. It's pretty simply - just take newspaper, trace every item you plan to hang, cut out the "stencils" and use painters tape to layout your entire wall design. When I was finished taping up my templates, the wall looked like a gallery of clothes, electronic and furniture, but that didn't last for long.

Oh, and one important step I don't want to forget. After you trace the item and cut out the stencil, flip the frame (or whatever the item is) over, place the template on top and put a dot in the exact spot the nail will be used to hang that item. Life saving tip right there! The next step is pretty self explanatory... break out that hammer and place a nail into each hole you have marked on the paper. I literally nailed through each and every piece or paper, and left the templates there until I was ready to hang each item at the end (so I wouldn't forget where everything was supposed to go). It is hard to see in this dark photo, but the nail was hammered straight through the paper and into the wall.

And now, for the big reveal!


I absolutely LOVE it!!! It's hard to see every detail from afar, so here is a close up and breakdown of each item I chose to hang in our little entryway gallery. I'll start from the top and work my way down in each photo.


Large Photo - Caton and me at a winery in Sonoma, California last September.
Mini Photo - A photo of myself as a toddler. I plan to add one of Caton as a toddler as well; as soon as my mother-in-law scans it and sends it to me. :)
Blue Sign - This wooden sign says "Wine drinkers gather here." and we bought it at a winery in California on the trip I mentioned above last September.

Wooden Angel - My paternal grandmother recently moved from her apartment to an assisted loving community, so she gave away many of her personal belongings to prepare for the smaller living space. This wooden angel is a piece that hung on the fireplace/mantel at all three homes my grandparents have lived in since I was born and I have always loved it. I feel so blessed that she gave it to me as my keepsake item.
Photo - It pretty much speaks for itself - the Golden Gate Bridge. So beautiful!
Map Art - This idea came from here and here. I had Caton find me an old map, since we use our phone or the car GPS, made some templates - a heart, the shape of an engagement ring, and the shape of two wedding rings overlapping - and cut them out over the cities where we met/felling in love (Emporia, KS), got in engaged (Wichita, KS) and got married/live (Prairie Village, KS). I already owned the scrap paper, the map and frame, so this project was free!

W - This W is one of the solid gold letters you can buy from Hobby Lobby. They always seem to be on sale and I love them. I am not a big fan of gold, so as soon as I purchased this large letter I took it home and gave it a couple good coats of black gloss spray paint. Perfect!
Cross - This blue tile cross is one I found at my favorite thrift store in Wichita, The Boutique. I think it was handmade by the previous owner but I loved it the second I saw it. The bright blue tiles are so fun!

Celtic Cross - Have I mentioned before that my all-time dream trip is to visit Ireland? Well, if you can't obsess over having actually visited a country, you can obsess over one of your favorite wedding gifts ever! My awesome aunt and uncle gave us this amazingly beautiful Celtic cross and it comes straight from, you guessed it, Ireland! I LOOOVE IT!
Quote - The frame was $1.00 from Savers. The yellow scrapbook paper was in my stash upstairs. The quote was in with all of my scrap booking stickers/quotes/papers. I love "almost free" art. It reads: "Where there is love, there is life."
Cartoon - Caton actually gets credit for this awesome piece of art. When he was doing all of this business travel to Texas, he would read many a business journal on the flight to/from Dallas and I was so excited when he brought this home. I simply cut the cartoon off of the page, taped it to scrapbook paper and framed it up. Donezo! In case you can't see it very well, it's a cartoon of a cowboy visiting a psychologist and he says to the man, "I think you need to enroll in a good two-step program." Ha. Considering we love two-stepping, this just fit us perfectly. Thanks to

Quote Sign - It speaks for itself. Jeannie gave this to me as a Christmas gift a couple years ago. I love it. And I love her. We definitely became sisters by chance, and although it took years, I'm so glad we made the choice to be best friends!
Horse Shoe - I wish I could say this belonged to some profitable horse we bet on, or own, but we'll keep dreaming. I found this at an auction outside of Wichita, KS and just liked it and the luck it represents.
Photo - This photo is an oldie but a goodie! This was a great night that we'll probably never forget.

Scrabble Tiles - I'm sure everyone has seen these all over Pinterest and Blogland, but I couldn't resist. We had an old Scrabble game so I "borrowed" a couple tiles to make this little piece of art. Love You Forever. True story!
Mini Photos - These lovely photos are my parents. I LOVE them! I need to check for sure, but I believe my mom's is from when she was a high school senior and my dad's is from when he was a college senior. What a good looking couple. As you'll see below in a second, I posted my high school senior photo as well and it is almost creepy how much my mom and I look alike. Well, you know, considering we're not actually related by blood. I guess it just goes to show you that somethings really are meant to be!

River Rocks on Canvas - This is another super-easy project. I found the canvas on sale at Micheal's for a couple dollars and I already owned the colorful river rocks from some other projects I have been working on. I simply hot glued them to the canvas and it was ready to hang on the wall. Easy-peasy.
Mini Card - It's hard to read in the photo, but this card reads: Kathleen Fagan, which is my maiden name. I have boatloads of these things leftover from stationary sets and I think it's kind of fun to see that old name every once in awhile.
Mini Photo - As I mentioned above, this is my senior photo. I also plan to get a copy of Caton's (and hopefully my mother-in-law and father-in-law) from my MIL so we can have that set up in the gallery as well.

Family Rules Sign - Have I mentioned lately that I'm obsessed with Hallmark? OB-SESSED! In this day in age of e-card, Facebook, Twitter and just plain lack of snail mail, I am still a Platinum level member at Hallmark. Yes, I'm a dork and yes, I'm OK with it! This cute sign is from the one and only and reads: Family Rules - fight fair, forgive fast, love much. So cute, and so true.
Large Photo - This photo is from... you guessed it... our California trip. It was so much fun to visit the Golden Gate Bridge and luckily there was a very nice woman there who offered to take our photo with the bridge in the background (such a nice alternative to the standard Caton-holds-his-arm-out-as-far-as-possible method to catching photos of both of us together on trips).
Numbers - These framed numbers are another Pinterest-inspired project. The numbers may run all together and be meaningless to everyone else who walks by, but to us they stand for the following: 04-13-1984 - Kathleen's birthday; 08-07-1984 - Caton's birthday; 11-09-2003 - the anniversary of us becoming a couple in college; 03-15-2007 - the day Caton popped the question and I said YES; 07-12-2008 - our wedding day. I love this project because we can always add dates and expand the list; maybe the day we buy our first home, or the dates our (future) children are born. The options are endless!
Fleur-de-lis - This beautiful iron piece was a souvenir from our trip to New Orleans when our friends, Katie & Billy, were married.
Fleur-de-lis - This beautiful iron piece was a souvenir from our trip to New Orleans when our friends, Katie & Billy, were married.

Walker Sign - I love this Walker subway art. It's the perfect central piece and focal point for the gallery wall!

Plaque - This plaque was a gift from my good friend, Mary Beth. It is a beautifully engraved piece that says the Irish Wedding Blessing. This was one of my all-time favorite wedding gifts - so personal and just perfect. MB knows me well!
Framed Quote - This is a fun quote I saw online, typed up in Word, printed out on card stock, and framed.

Invitation Frame - Another one of my favorite wedding gifts is this framed and matted invitation/reception card from our wedding. A good family friend gave this to me and inspired me to begin collecting, framing and giving them as gifts to many of my family members and friends. So personal and fun to look at and read every so often.
Photo - Finally, a photo that is NOT from our California trip. This photo was taken at another one of our favorite vacations spots - Vail, CO.
Wine Corks - These are wine corks I collected from our favorite wineries we visited in Sonoma last fall. I found the perfectly sized frame at a thrifts store, painted it black, took out the glass and hot glued the corks to a piece or scrap book paper (that was glued to the back of the frame so it wouldn't fall out). It's such a fun memory for us to remember our favorite wines and places we visited in the Dry Creek Valley.
Well, there you have it - our gallery wall! I think my favorite part is that it can always grow and always change. I have already added a few different pieces to the top and sides of the wall (more posts to come later so I can show you how I made these pieces) and look forward to evolving this wall of our home (or future homes) for years to come!